Manage broadcasts
View Broadcast center
The Broadcast center is only available to users who have permission to create broadcasts.
- Click on your name or profile photo on the top right of any page.
- In the menu that opens, click Broadcast center.
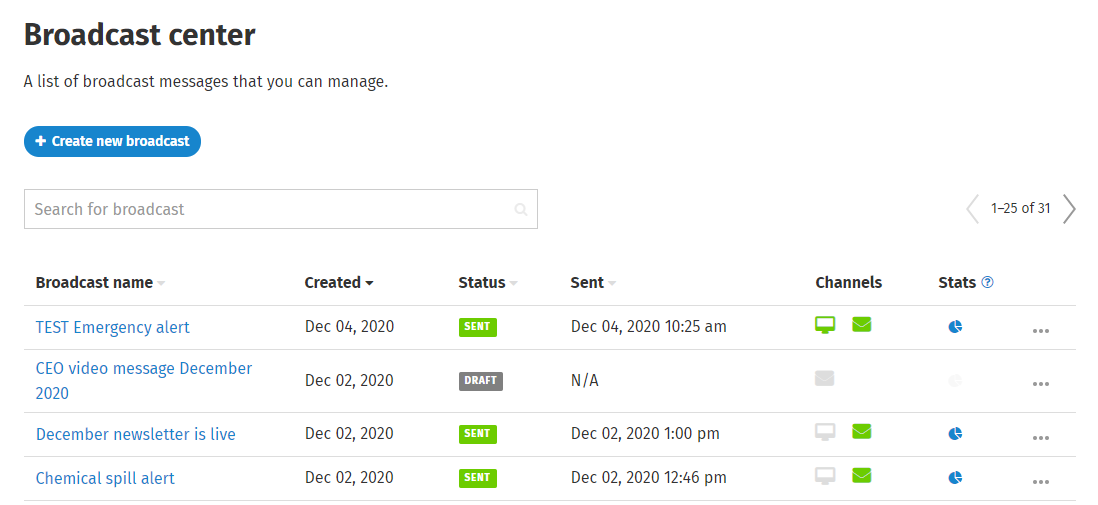
You will be taken to the Broadcast center. In the Broadcast center, you can create broadcasts and view a list of broadcast messages that you can manage.
For each broadcast that you can manage, you see the Broadcast name, the date it was created, the current status, the date and time it was sent/is scheduled to be sent, and the channels through which it was sent. You can click on the Stats icon to see broadcast statistics.
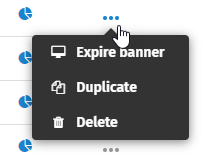
Click the three dots ... to see more options for broadcast actions. If the broadcast is still in draft status, you will see options to edit, duplicate or delete the broadcast. If the broadcast is scheduled, you will see options to unschedule and edit, duplicate or delete the broadcast. If the broadcast has been sent, you will see options to expire the banner (if it is still live), duplicate or delete the broadcast.
Clicking on the broadcast name will take you to viewing the broadcast. When viewing a broadcast, click Back to broadcast center to return to the main broadcast dashboard.
No notifications are created for changes made to broadcasts, but broadcast activity can be viewed by clicking View activity in the section below the broadcast title when viewing or editing an individual broadcast.
Search and sort broadcast center
Only the broadcast name is searchable. The broadcast center does not have Find-as-you-type search like the main search in ThoughtFarmer, so make sure you press Enter after you type in your search term to see results. Clear your search by clicking the X on the right of the search field. The default sort of the broadcasts is the created date, from newest to oldest. The list can be sorted by Broadcast name, Created date, Status or Send date. Click on a column title to sort by that column, click again to reverse the sort.
Clicking on the broadcast name takes you to the broadcast editing page for broadcasts with a Draft status, and to a view-only version of the Broadcast page for Sent or Scheduled broadcasts. The Channels column shows you what channels the broadcast was sent on. The computer monitor icon indicates intranet banner. The envelope icon indicates email. The phone icon indicates mobile push notification. Microsoft Teams and Slack logo icons indicate those channels if they are enabled on your intranet.
![]()
This table shows what the different icon colors indicate about broadcast status:
| Orange | Green | Gray | |
| Banner (Monitor icon) | Scheduled | Live | Draft or Expired |
| Email (Envelope icon) | Scheduled | Sent | Draft |
| Mobile push (Phone icon) | Scheduled | Sent | Draft |
Broadcast statistics

The Broadcast stats modal shows you:
- The total number of recipients who were sent the broadcast on any channel (intranet banner, email or mobile push)
- Banner views:
- The number of unique recipients who have viewed the banner
- The number of unique recipients who have not viewed the banner
- Banner clickthroughs:
- The number of unique recipients who clicked on the "Read more" link in the banner
- The number of unique recipients who did not click on the "Read more" link in the banner
- Email link clickthroughs:
- The number of unique recipients who clicked on the "Read more" link at the end of the email
- The number of unique recipients who did not click on the "Read more" link at the end of the email
- Mobile tap throughs
- The number of unique recipients who tapped on the message
- The number of unique recipients who did not tap on the message
- Microsoft Teams or Slack clickthroughs:
- The number of unique recipients who clicked on the "Read more" link in the broadcast
- Microsoft Teams or Slack team/channel:
- The app teams/channel(s) that the broadcast was sent to
Expire broadcast banner
You can set a date for a broadcast banner to automatically expire and stop displaying. (To learn more, see Create broadcasts.) If you have set the banner to never expire, or you want the banner to stop displaying before it is set to expire, you can manually expire the banner.
When you expire a banner, recipients no longer see it, even if they did not dismiss the banner. On the broadcast center, you can hover over the monitor icon to see the date and time when the banner expired, or is set to expire. If the banner is live, the icon is green. If the banner is expired, the icon is gray.
- Go to the Broadcast center.
- Locate the broadcast that you want to expire.
- Click the ... dots on the right of the broadcast.
- Click Expire banner in the menu that appears.
- Click Expire banner in the Expire intranet banner pop-up window to confirm that you want to expire the banner.

Unschedule and edit scheduled broadcast
Once a broadcast is scheduled, it can't be edited unless it is unscheduled first. Once it is unscheduled, it is put back into draft mode. After editing, it can be saved as a draft, scheduled again, or sent immediately.
- Go to the Broadcast center.
- Locate the broadcast that you want to unschedule and edit.
- Click the ... dots on the right of the broadcast.
- Click Unschedule and edit in the menu that appears.
- In the Unschedule and edit pop-up window, confirm that you want your broadcast to unschedule and revert back to draft mode for editing.
- Edit the broadcast as desired, and then Save draft, Send or Schedule it again.
Duplicate broadcast
You can easily create a broadcast that is similar to a previous broadcast by duplicating it. Broadcast name, recipients, title/subject, banner and email text, and selected channels will all be copied to the duplicated broadcast.- Go to the Broadcast center.
- Locate the broadcast that you want to duplicate.
- Click the ... dots on the right of the broadcast.
- Click Duplicate in the menu that appears.
- In the Duplicate broadcast pop-up window, the broadcast name will show the name of the duplicated broadcast with "COPY" at the end. Enter a new name for your broadcast.
- Click Duplicate to create the new broadcast. The broadcast is opened in edit mode. All the fields entered in the original broadcast are copied over.
- Edit the new broadcast as desired, and then Save draft, Send, or Schedule it.
Delete broadcast
If you delete a broadcast, it is permanently removed from the broadcast center and cannot be restored. If a banner is live, it will be removed from view when you delete the broadcast.
- Go to the Broadcast center.
- Locate the broadcast that you want to delete.
- Click the ... dots on the right of the broadcast.
- Click Delete in the menu that appears.
- Click Delete in the Delete broadcast pop-up window to confirm that you want to delete the broadcast/banner.

Comments
0 comments
Please sign in to leave a comment.