Create broadcasts
Intro to Broadcasts
Broadcasts are a means of quickly getting an urgent or important message out to the right people. You can alert an entire organization, users in a certain location or department, or specific individuals. Broadcasts can be used for emergency communications, such as alerting people to a severe weather event or a health and safety issue at their location. Broadcasts can also be used to announce the release of an important communication.
Standard broadcasts are brief and are designed for quick creation and transmission. Custom broadcasts allow more content and basic formatting options. Broadcasts can be created and scheduled to go out at a future date and time. Multiple broadcasts can be active at once. Whereas users can opt out of receiving intranet notifications, they cannot opt out of seeing broadcast banners or receiving broadcast emails. Users must allow notifications from the ThoughtFarmer mobile app in order to receive broadcast push notifications on mobile devices.
See Enable broadcasts for administrator instructions on how to turn broadcasts on or off and set permissions.
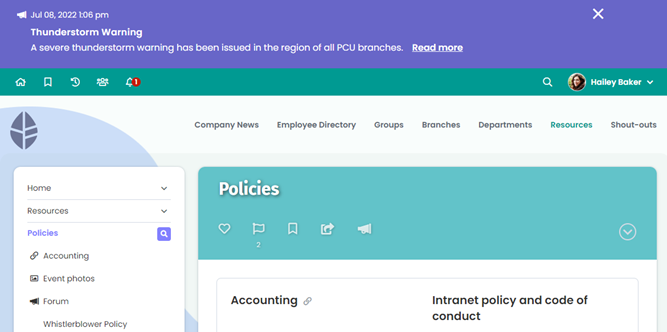
Broadcast banners show at the top of the page, above the app toolbar
How do broadcasts display?
Broadcasts can be sent as intranet banners, emails, mobile push notifications, or all three. Broadcast banners appear across the very top of all intranet pages, and can be individually dismissed from view by a user. If a user is on the intranet when a broadcast is sent, the broadcast banner will display when they next navigate to a new page. If a user is not on the intranet when a broadcast is sent, they will see the broadcast banner when they next log in, if the banner is still active on the intranet. Banners do not appear on pages that are in edit mode.
If the Microsoft Teams or Slack integrations are enabled for your intranet, broadcasts can also be sent through channels in those apps.
Banner and mobile push broadcasts also show in the Notifications tab of the Alerts menu, and on the Notifications history page. If a user dismisses a banner or mobile push broadcast and wants to refer to it again, they can view it in their notifications. If a banner has expired, it will not show there.
The default color for the banner background is based on the Primary color selected when creating a new theme. Banner background and text color can be modified on the Theme panel > Colors tab. To learn more, see the Theme Colors page.
Intranet banners can contain:

- Date and time broadcast was published
- Title
- Text and link to more info (if included)
- Down arrow to expand banner if there is more than 140 characters of text
- X in top right to dismiss the banner
- Numbers that show that there are multiple broadcasts
- Arrows that allow navigation between multiple broadcasts
The owner or creator of the broadcast does not appear in the broadcast banner, email, or mobile push notification, but can be viewed on the individual broadcast page accessed from the broadcast center.
The banner does not "stick" to the top of the page as you scroll down the site, but displays only in its place at the top of the page.
Broadcast emails can contain:
- [Intranet name] Title/Email subject
- Email header image (custom broadcast only)
- Text
- Button link to more info
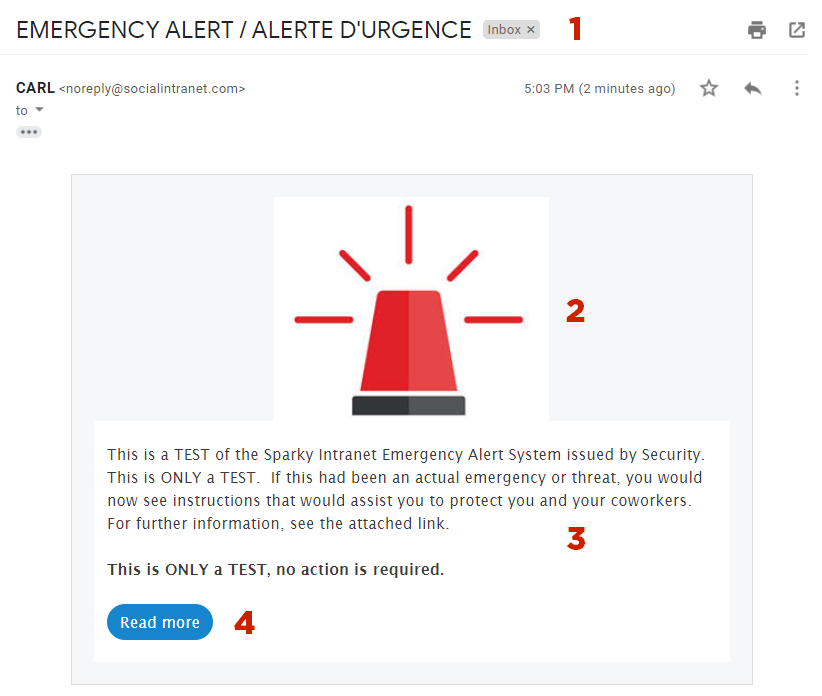
Broadcast emails show as coming from the intranet's outgoing email address. The name of the broadcast owner or creator does not appear in the broadcast email.
Mobile app push notifications contain:
- Mobile App icon and name (ThoughtFarmer)
- Mobile intranet name
- Title
- Text
- Link to more info (if included)
The ThoughtFarmer mobile app must be enabled on the intranet in order to send broadcasts by mobile push notification. Mobile app is enabled by default on TF versions 10+. Users must allow the ThoughtFarmer mobile app to send notifications in order to receive Broadcast push notifications from the app. On Android devices, notifications are enabled by default on installation of the ThoughtFarmer mobile app. On Apple devices, a prompt displays after first login asking the user to allow notifications from ThoughtFarmer.
View Broadcast center
The Broadcast center is only available to users who have permission to create broadcasts.
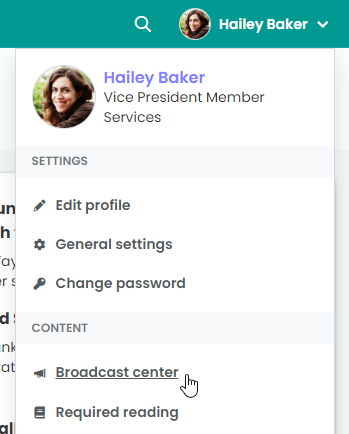
- Click on your name or profile photo on the top right of any page.
- In the menu that opens, click Broadcast center.
You will be taken to the Broadcast center. In the Broadcast center, you can create broadcasts and view a list of broadcast messages that you can manage.
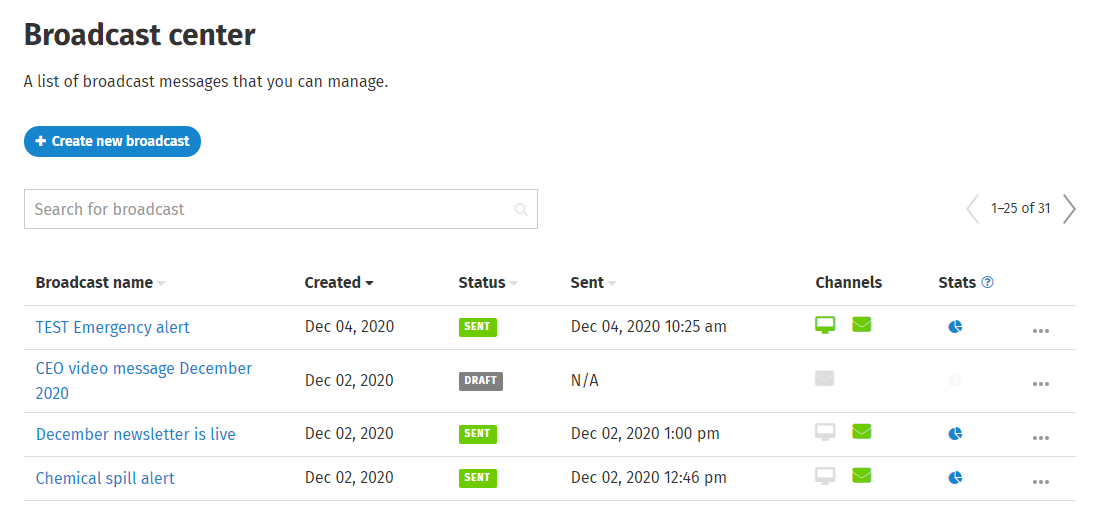
For each broadcast that you can manage, you see the Broadcast name, the date it was created, the current status, the date and time it was sent/is scheduled to be sent, and the channels selected for that broadcast. You can click on the Stats icon to see broadcast statistics.
Click the three dots ... to see more options for broadcast actions. If the broadcast is still in draft status, you will see options to edit, duplicate or delete the broadcast. If the broadcast is scheduled, you will see options to unschedule and edit, duplicate or delete the broadcast. If the broadcast has been sent, you will see options to expire the banner (if it is still live), duplicate or delete the broadcast.
Clicking on the broadcast name will take you to viewing the broadcast. When viewing a broadcast, click Back to broadcast center to return to the main broadcast dashboard.
No notifications are created for changes made to broadcasts, but broadcast activity can be viewed by clicking View activity in the section below the broadcast title when viewing or editing an individual broadcast.
Create a Standard broadcast
A Standard broadcast is a very short message that can be quickly pushed out to all channels. The Title/Subject is a maximum of 25 characters. The broadcast Text is a maximum of 140 characters. Once a broadcast is sent, the content of the broadcast cannot be changed. Broadcasts can be saved as drafts and reviewed and edited before they are sent. Broadcasts can also be scheduled to send at a future date and time.
(A Custom broadcast allows for longer text than a Standard broadcast, as well as formatting and custom text for different channels. To learn more, see the heading Create a Custom broadcast.)
- Go to the Broadcast center.
- Click + Create new broadcast.
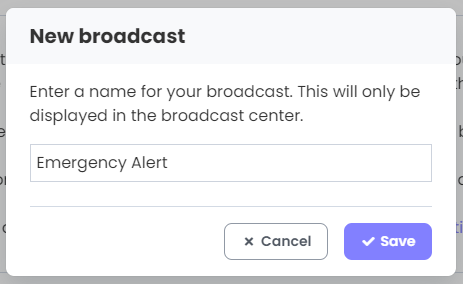
- In the New broadcast pop-up window, create a reference name for your broadcast and type it in the Enter broadcast name field. (This name will only be displayed in the broadcast center. It is not part of the message sent to recipients.) Click Save.
- You are taken to the Broadcast editing page. Under Send date, choose whether you want to send the broadcast immediately, or schedule the broadcast to send at a future date and time. If you wish to send the broadcast at a future time, click in the date, time and timezone fields to select the desired date and time.

- Under Message, the radio button for a creating a Standard broadcast is selected.
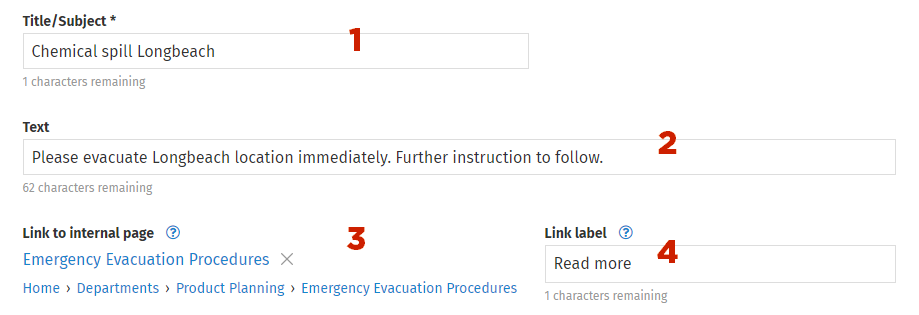
- In the Title/Subject field, enter the banner title/email subject for your broadcast. (Max 25 characters)
- In the Text field, enter the text that you want to include in your broadcast. (Max 140 characters)
- To link to an intranet page, in the Link to internal page field, start typing the name of the intranet page that you want to link to. Select the page when it appears in the dropdown menu.
- In the Link label field, enter the text that you want to display for the link. Default text is Read more. (Max 10 characters)
- Under Channels, select the checkbox(es) for the channel(s) that you want to send the broadcast out on. Once you select a channel, you can click Preview banner or Send test email or Send test push notification to see broadcast previews for those channels. If you have Microsoft Teams or Slack integrations enabled for your intranet, you can click Send test message to see broadcast previews for those channels. (To learn more, see Preview banner, email or push notification heading below.)
- If you select Intranet banner as a broadcast channel, you can select a date and time for the banner to automatically Expire on and stop displaying, or you can choose for the banner to Never expire. By default, the banner is set to expire 30 days from the creation date, at 11:30pm in the creator's timezone.
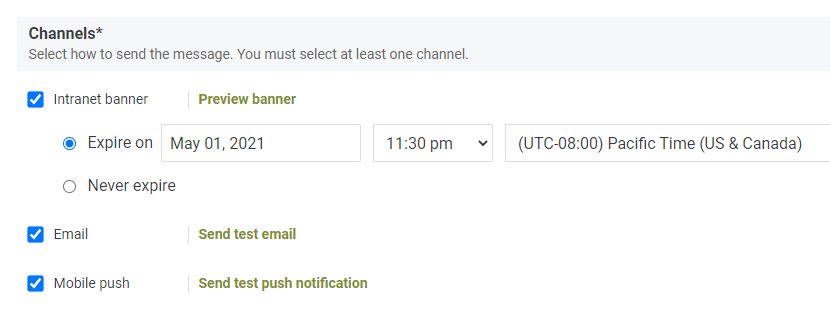
- If you select Intranet banner as a broadcast channel, you can select a date and time for the banner to automatically Expire on and stop displaying, or you can choose for the banner to Never expire. By default, the banner is set to expire 30 days from the creation date, at 11:30pm in the creator's timezone.
- If you select any of the Intranet banner, Email, or Mobile push channels, the Recipients heading will appear below those channels. Under Recipients, click in the Search field, and start typing the name of an individual or security group that you want to receive the broadcast. Select the name when it appears in the dropdown menu. Repeat to add more individuals or security groups. The total number of recipients selected will show below the field.
- (Only available if the Microsoft Teams or Slack integrations are enabled for your intranet.) If you select either of the Microsoft Teams or Slack broadcast channels, you will be prompted to log in to your account for those apps if you are not already logged in.
- Microsoft Teams: Once you are signed in, you can select a Team and Channel to send the broadcast to from the dropdown menus. It may take a moment for the dropdown menus to load from Microsoft Teams. Click Add to select multiple channels to send the broadcast to.
- Slack: Once you are signed in, you can select a Slack channel to send the broadcast to from the dropdown menu. Click Add to select multiple channels to send the broadcast to.
- When you are finished editing:
- Click Save draft to save the broadcast as a draft, OR
- If you want to send the broadcast immediately, click Send, and confirm in the Send standard broadcast pop-up window that you want to Send the broadcast immediately, OR
- If you have selected a future date and time for the broadcast to go out, click Schedule, and confirm in the Schedule standard broadcast pop-up window that you want to Schedule the broadcast.
- If you choose to send/schedule the broadcast, a toaster message will briefly appear that says Your broadcast was sent/scheduled successfully.
Schedule future broadcast
By default, a new broadcast is set to send immediately on clicking the Send button. Under the Send date heading, you can also choose to schedule a broadcast to send at a future date and time. Click in the date and time fields to choose when to send your broadcast. By default, a scheduled broadcast will be set to send two hours in the future (rounded to the next 30 minute interval).

When a broadcast is set to send at a future date and time, the Send button changes to say Schedule. When you are finished editing the future broadcast, click the Schedule button and you will see the broadcast with a "Scheduled" status in the broadcast center. If you want to make edits after scheduling a broadcast, you must click Unschedule and edit, either in the header when viewing the schedule broadcast, or from the right hand ... menu on the broadcast center.

Recipients
For broadcasts sent as intranet banners, emails, or mobile push notifications, you can add security groups to the recipients list to add multiple recipients at once. When the broadcast is sent, the broadcast will go to users in the security group as of that date and time. If a new user is added to the security group at any point after the broadcast is sent, they will not receive a broadcast email, push notification, or see the broadcast banner. This includes the security group All registered users.
If a user is in multiple security groups that have been added as recipients, they are only counted once in the number of total recipients.
For broadcasts sent to Microsoft Teams or Slack channels, all members of those channels will be able to view the broadcast in the corresponding app. This means that channel members who do not have intranet accounts will be able to see broadcasts sent from the intranet to those channels. However, if there is a link to an intranet page in the broadcast, intranet security will apply and they will not be able to view the page.
Banner expiry
The broadcast banner expiry date by default is set to 30 days after the creation date, at 11:30pm in the creator's timezone. Changing the send date does not automatically update the banner expiry date. Users can dismiss the broadcast banner before the expiry date by clicking the X in the top right corner of the banner. When the banner expires, it will stop displaying for any users that have not already dismissed it.

If you choose for the broadcast banner to never expire, users can still dismiss the banner by clicking the X in the top right corner of the banner.
Preview banner, email, push notification or message
When you select the Intranet banner channel when editing a broadcast, the option to Preview banner appears. Click on Preview banner to see a pop-up of how the banner will look at the top of the intranet page when it is sent. The banner preview shows that the intranet banner appears above the App Toolbar on intranet pages.
Broadcast emails are sent to the selected recipients' addresses associated with their intranet accounts. When you select the Email channel when editing a broadcast, the option to Send test email appears. Click Send test email to open a pop-up where you can edit or confirm the email address that the test email will be sent to. By default, the email address associated with your intranet account is the address that the test email will be sent to. If you want the test email to go to a different address, enter that address and click Send in the Send test email pop-up window. The subject line of the test email will be pre-fixed with TEST to show that it is not an actual broadcast.
When you select the Mobile push channel when editing a broadcast, the option to Send test push notification appears. Click on this option to send a test mobile push notification to the mobile device that you have installed and logged in to the ThoughtFarmer mobile app on. Confirm in the pop-up that you want to send the test push notification. You can review the content and layout of the push notification broadcast before sending it out to all recipients. Because of size limits, the test push notification does not say "Test" at the beginning.
When you select the Microsoft Teams or Slack channels when editing a broadcast, the option to Send test message appears. You must link your Microsoft Teams and intranet accounts before you can receive a test broadcast message in Microsoft Teams. Click Send test message and then confirm in the Send test message pop-up that you want to send the message. A test message will be sent as a chat message or direct message from the intranet app to you. You can review the content and layout of the broadcast before sending it out to all of the recipients. The Microsoft Teams and Slack test messages do not say "Test" at the beginning.
Multilingual broadcast
If multiple languages are enabled on your intranet, you can send a broadcast in multiple languages. After a broadcast is sent, you can view the multilingual content when viewing the broadcast by using the language dropdown menu. Multilingual broadcast is not supported for Microsoft Teams or Slack channels.
- When creating or editing a broadcast, click on the translation language menu in the top right. Select the language that you want to localize the broadcast for.
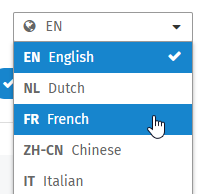
- Enter localized text for the Title/Subject field, Text field and Link label field (For Custom broadcasts, you can localize these three fields under Banner, Email and Mobile push). Modifying other fields will change those fields for all languages.
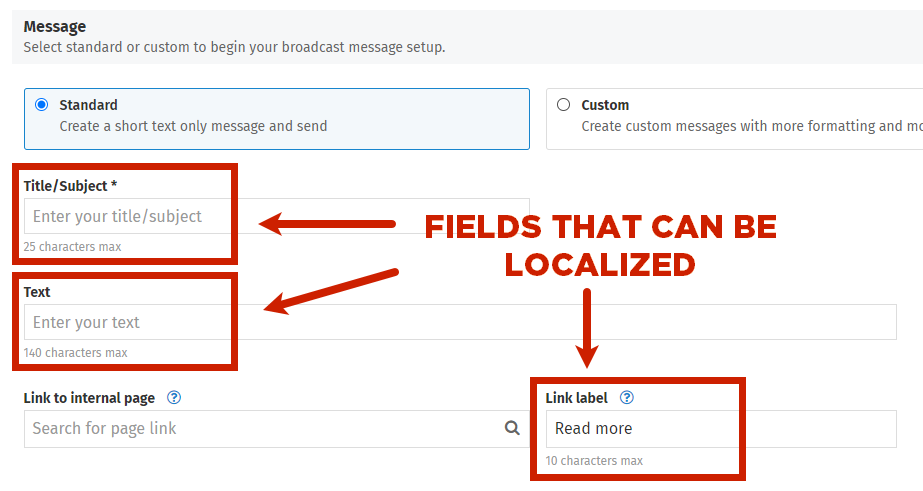
- Repeat steps 1 and 2 to add more languages.
- When you are done editing, click Save draft, Send, or Schedule.
Create a Custom broadcast
A Custom broadcast allows for a longer title and text than a Standard broadcast, as well as options such as adding formatting and custom text for different channels. For banners, the first 140 characters of the text will always show. The remaining text can be viewed by expanding the banner.
Custom broadcasts can be sent to Microsoft Teams and Slack channels as well, however the character limits and options are the same as standard broadcasts for these channels.
Broadcasts can be saved as drafts and reviewed and edited before they are sent. Once a broadcast is sent, the content of the broadcast cannot be changed. If a broadcast is scheduled for a future date or time, it can be unscheduled and edited, and then scheduled again.
- Go to the Broadcast center.
- Click + Create new broadcast.
- In the New broadcast pop-up window, create a reference name for your broadcast and type it in the Enter broadcast name field. (This name will only be displayed in the broadcast center. It is not part of the message sent to recipients.) Click Save.
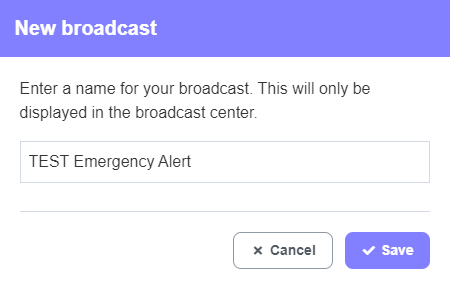
- You are taken to the Broadcast editing page. Under Send date, select whether you would like to send the broadcast immediately, or schedule the broadcast to send at a future date and time. If you wish to send the broadcast at a future time, click in the date, time and timezone fields to select the desired date and time.

- Select the radio button for Custom broadcast to create custom messages with more formatting and options.

- Under Channels, select the checkbox(es) for the channel(s) that you want to send the broadcast out on: Intranet banner, Email, or Mobile push.
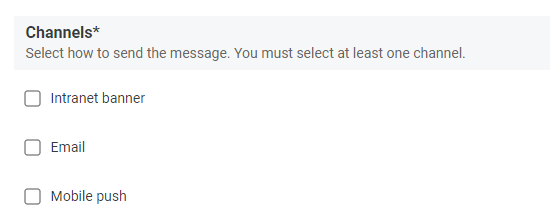
- For the Intranet banner:
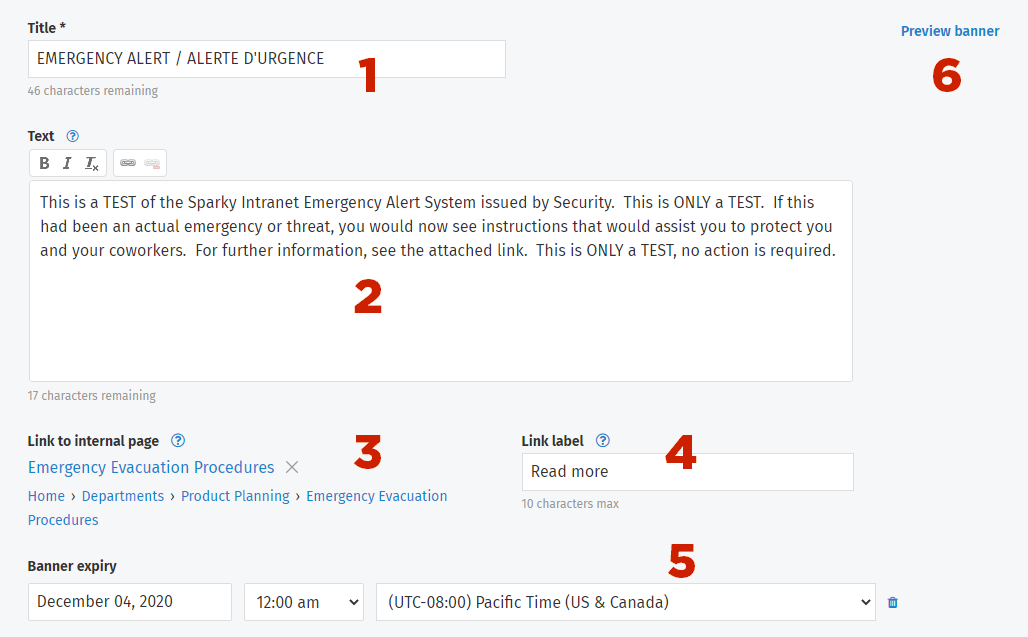
- In the Title field, enter a title for the broadcast banner. (Max 80 characters)
- In the Text field, enter the text for the broadcast banner. Add bold, italics, links or line breaks as desired. (Max 350 characters)
- In the Link to internal page field, start typing the name of the intranet page that you want to link to. Select the page when it appears in the dropdown menu.
- In the Link label field, enter the text that you want to display for the link. (Max 10 characters)
- In the Banner expiry fields, you can select a date and time for the banner to automatically expire and stop displaying, or you can choose for the banner to never expire. By default, the banner is set to expire 30 days from the creation date, at 11:30pm in the creator's timezone.
- Click Preview banner in the top right to see what the intranet banner will look like.
- For Email:
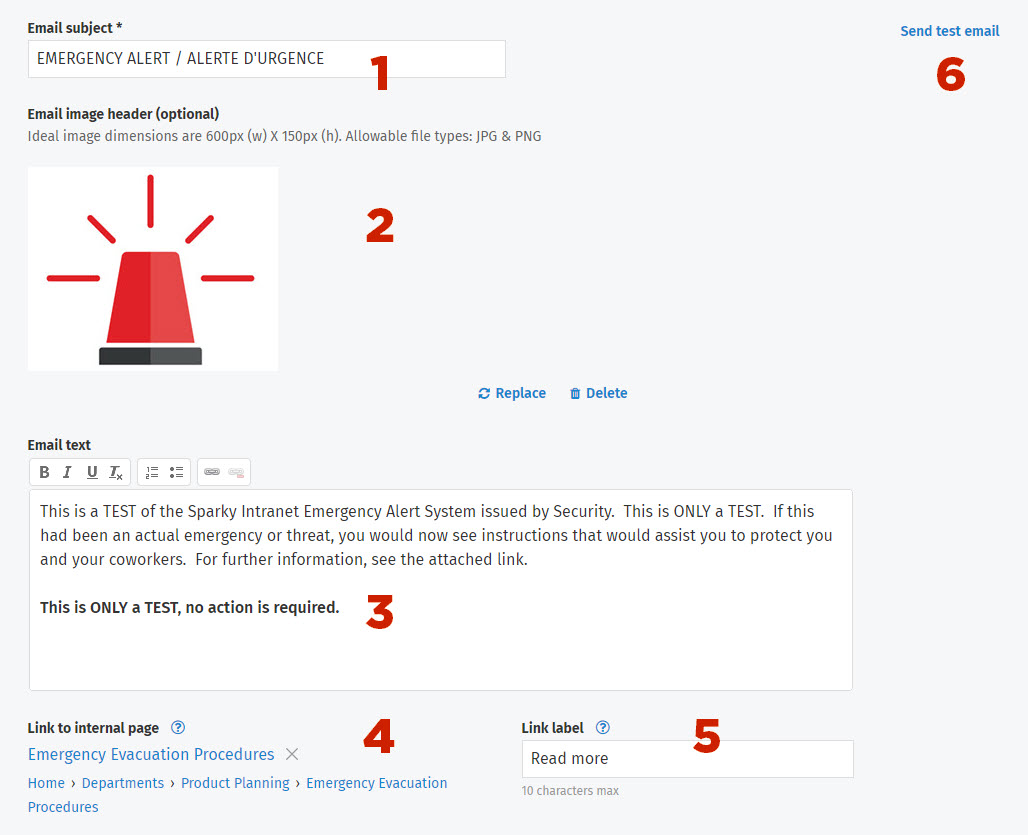
- In the Email subject field, enter the subject for the broadcast email. (No max character limit)
- In the Email image header field, drag and drop or browse to upload an image to show at the top of the email. (See the Email header image heading below for more details.)
- In the Email text field, enter the text for the broadcast email. (No max character limit) Add bold, italics, underline, numbered and bulletted lists, links or line breaks as desired.
- In the Link to internal page field, start typing the name of the intranet page that you want to link to. Select the page when it appears in the dropdown menu.
- In the Link label field, enter the text that you want to display for the link. (Max 10 characters)
- Click Send test email in the top right to send a test broadcast email to preview how it will display for the recipient. The default email address in the Send test email pop-up window will be yours, but you can type a different email address to send the test email to. Click Send in the window to send the test email.
- For Mobile push:
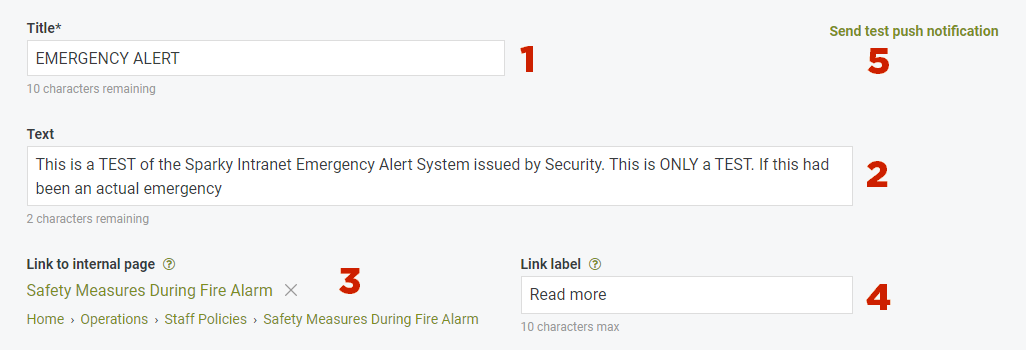
- In the Title field, enter a title for the broadcast push notification. (Max 25 characters)
- In the Text field, enter the text for the broadcast push notification message. (Max 140 characters)
- In the Link to internal page field, start typing the name of the intranet page that you want to link to. Select the page when it appears in the dropdown menu.
- In the Link label field, enter the text that you want to display for the link. (Max 10 characters)
- Click Send test push notification to send a push notification to your mobile device to see what the push notification will look like.
- Under Recipients, click in the Search field, and start typing the name of an individual or security group that you want to receive the broadcast. Select the name when it appears in the dropdown menu. Repeat to add more individuals or security groups. The total number of recipients selected will show below the field.
- For Microsoft Teams and Slack:
- You can add a Title, Text, Link to internal page and Link label for each channel (as described for the other broadcast channels, while staying within their respective character limits).
- For Microsoft Teams, select a team and channel to send the broadcast to. For Slack, select a channel to send the broadcast to. Click Add to send the broadcast to more channels.
- Click Send test message to see broadcast previews for those channels.
- When you are finished editing:
- Click Save draft to save the broadcast as a draft, OR
- If you want to send the broadcast immediately, click Send, and confirm in the Send custom broadcast pop-up window that you want to Send the broadcast immediately, OR
- If you have selected a future date and time for the broadcast to go out, click Schedule, and confirm in the Schedule custom broadcast pop-up window that you want to Schedule the broadcast.
- If you choose to send/schedule the broadcast, a toaster message briefly appears that says Your broadcast was sent/scheduled successfully.
Email header image
Allowed file types for the broadcast email header image are jpg and png. Ideal image dimensions are 600 pixels wide X 150 pixels high. If the image is larger than 600 pixels wide, it will be scaled down. If it is smaller than 600 pixels wide, it will not be scaled up, and white space will show on either side of the image in the email.
Create broadcast from a page
Creating a broadcast from a page will automatically:- populate the broadcast Title/Subject field from the page title
- add the page in the link to the internal page field
- add users and security groups with view or view and edit permissions on the page as broadcast recipients.
- Go to the page that you want to create a broadcast from.
- Click the More icon (three dots) in the page header to see more page actions.
- Click Broadcast in the menu that opens.
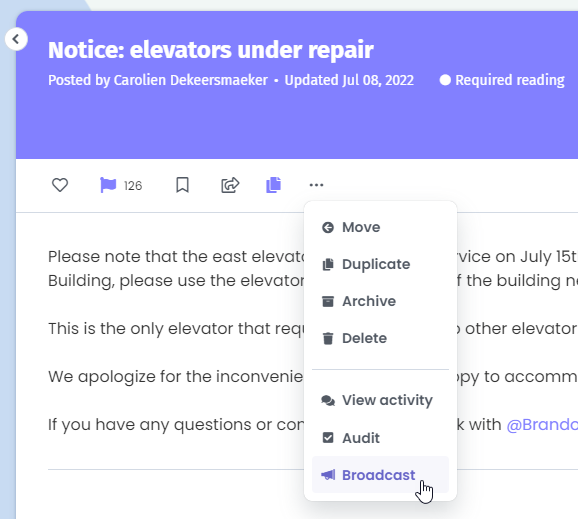
- In the New broadcast pop-up window, the title of the page is auto-populated as the reference name for your broadcast. If you want to give the broadcast a different name, delete the page title and enter the new name. (This name will only be displayed in the broadcast center. It is not part of the message sent to recipients.) Click Save.
- You will see the Broadcast editing page. Under Message, select the radio button for a creating a Standard or Custom broadcast.
- Follow the instructions for creating a Standard or Custom broadcast under the respective headings found above.
- The Title/Subject fields will be auto-populated with the name of the page that you created the broadcast from. The Link to internal page fields will be auto-populated with the page that you created the broadcast from. Edit other fields as desired.
- Select Intranet banner, Email, or Mobile push for your broadcast channels. Under Recipients, all users or security groups with permissions on the page that you are broadcasting have automatically been added as broadcast recipients.
- To remove recipients, click the X to the right of the user or group name.
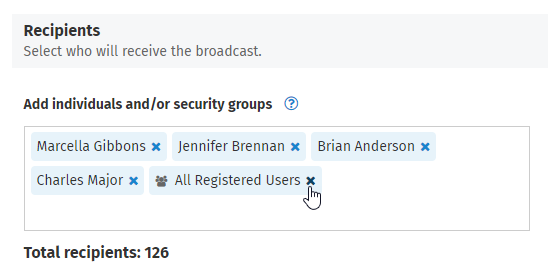
- To add recipients, click in the Search field, and start typing the name of the individual or security group that you want to receive the broadcast. Select the name when it appears in the dropdown menu. Repeat to add more individuals or security groups.
- The total number of recipients selected will show below the field.
- To remove recipients, click the X to the right of the user or group name.
- If you select Microsoft Teams or Slack broadcast, follow the instructions for creating a Standard or Custom broadcast for those channels under the respective headings found above.
- When you are finished editing:
- Click Save draft to save the broadcast as a draft, OR
- If you want to send the broadcast immediately, click Send, and confirm in the Send standard/custom broadcast pop-up window that you want to Send the broadcast immediately, OR
- If you have selected a future date and time for the broadcast to go out, click Schedule, and confirm in the Schedule standard/custom broadcast pop-up window that you want to Schedule the broadcast.
- If you choose to send/schedule the broadcast, a toaster message will briefly appear that says Your broadcast was sent/scheduled successfully.

Comments
0 comments
Please sign in to leave a comment.