Add a calendar event

Add an event
There are two ways to add an event to a calendar:
- Click the Add button (plus icon) in the page header of the calendar page. This will open a new page for editing. Continue to Step 3. OR
- Click any day and/or time on the calendar to add an event. (Click and drag to select multiple days for a multi-day event.) The Add Event pop-up window will appear, type in the event title in the What box. Click on the dropdown menu beside Event type to select the nature of your event (eg. Meeting, Statutory Holiday). Type in the location of the event in the Location box. Click Create event to add your all-day event to the calendar, or click Edit event details and go to Step 3 to add more info about your event.
Note that if you are viewing the calendar in List view, you must click the Add button to add an event, as it is not possible to select a date/time slot to add an event in List view.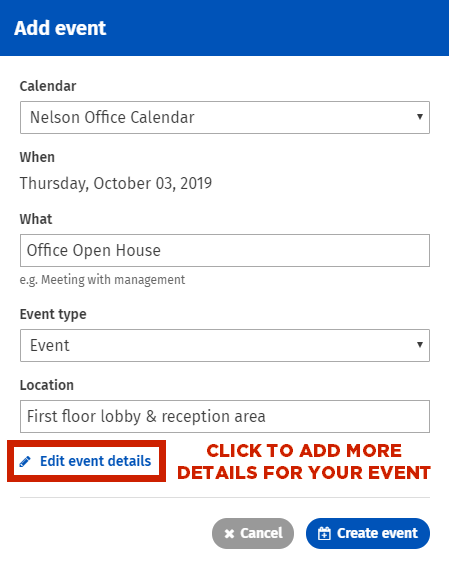
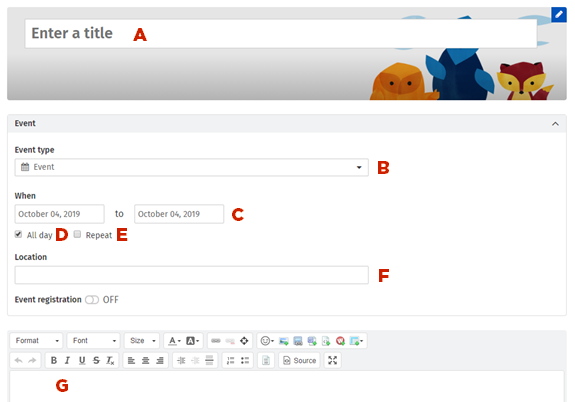
- Add info about your event:
- A: Type the title of your event in the Enter a Title box.
- B: Click on the Event type dropdown to select the nature of your event (eg. Meeting, Statutory Holiday) from the menu.
- C: Specify the date in the When boxes. Click in the date boxes to select dates from the pop-up calendars that appear.
- D: To specify times, uncheck the All day checkbox, and select times and the appropriate timezone by clicking in the time boxes. If the event will last all day, leave the All day checkbox selected.
- E: If your event will be a repeating event, check the Repeat box and see Add a repeating event below.
- F: Type the location of the event in the Location box.
- G: Type in the Rich Text Editor box to add more information about your event to the event page.
- Click Publish and the event will show up on the calendar on the date(s) you specified.
See how to create a shared calendar for information on viewing and creating events on shared calendars.
Edit an event
When you hover your cursor over an event on a calendar, a pop-up will appear with details of the event. In this pop-up, you can click View details to see details on the individual event page, Edit event to make changes to the event, or Delete to get rid of the event and event page.
Event registration
Event registration allows users to RSVP Yes or No to calendar events on the intranet. Event creators can keep track of who is coming to their event, limit the number of attendees, and ask attendees questions when they register. Event registration will only show on events if the event creator has enabled it. On calendars and calendar cards, a checkmark with the event indicates that event registration is available. When viewing a calendar, users can hover over the event to show the event details pop-up and RSVP from there. To learn more, see Event registration.
Add a repeating event
You can add an event that will repeat on a regular basis for a set amount of time, or indefinitely.
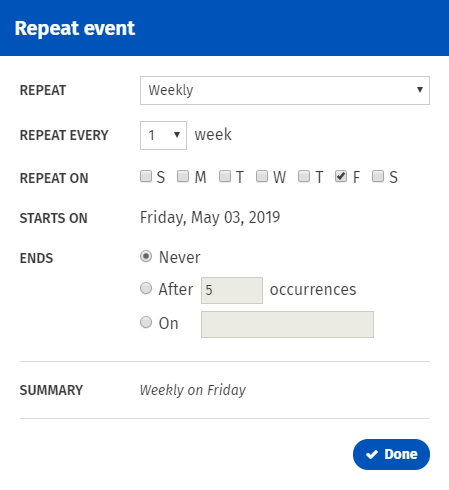
- When following the instructions above to add an event, select the Repeat checkbox under the When heading on the left. The Repeat event pop-up window will appear.
- In the Repeat dropdown: select how the event will repeat - Daily, Every weekday, Weekly, Monthly, or Yearly
- Depending on what you selected in the Repeat dropdown, various options will show in the Repeat event pop-up window:
- Repeat every: If you selected Daily, Weekly, or Monthly above, select how many of those units should pass before the next repeat. eg. Repeat every 2 months.
- Repeat on: If you selected Weekly, select the checkbox for the day(s) of the week you want the event to repeat on.
- Repeat by: If you selected Monthly, choose whether the event should repeat on the day of the month (eg. the 1st of the month) or the day of the week (eg. Thursday) that the initial event is on.
- Starts on: You cannot edit this date in the Repeat event dialog. To edit this date, close the dialog and change the date in the date boxes beside the When heading.
- Ends: Choose when the repeats will end: Select the radio button for
- Never: Select this to have the event repeat indefinitely.
- After a certain number of occurrences: Use the up and down arrows, or type in the box to select the number of occurrences before the event stops repeating.
- On a specific date: Click in the box to select the end date from the calendar.
- Click Done. A summary of the repeat pattern will show beside the Repeat checkbox.
- Continue creating your event, and click Publish or Save.
Edit repeating event
When you click Edit on a repeating event, the Edit repeating event pop-up window will appear. You need to choose whether you want to edit just the one instance of the event, or all events in the series of repeating events. Click on Only this event to leave the other events in the series the same. Click on All events to change all the events in the series.
When you choose to edit just one event in a series, the changes you make to that event will not affect any of the other events in the series.
If you want to edit when and how often a series of events repeats, choose to edit All events in the series. In edit mode, click on Edit beside the Repeat checkbox and summary under the When heading on the left. Then make your changes in the Repeat event dialog.
Comments
0 comments
Please sign in to leave a comment.