Add a basic page or post

How to add a basic page to your intranet
Use these instructions to add a simple page to your ThoughtFarmer intranet. You can add pages faster than you can create and save documents and you can edit a page as many times as you need to.
Edit page tour
The first time you add or edit a page, a tour prompt will appear giving you a quick introduction to the different parts of the edit page. The Edit page tour can be accessed at any time in edit mode by turning the Tour toggle above the page header ON and clicking the blue circles that indicate areas described on the tour.
Click Add and start editing!
- Click the Add button (plus sign) on the right of the Page Header. This will open a new page in edit mode.

- Type in a page title and add text in the content box just like you would an MS Word document. (See complete instructions on how to edit pages.)
- Click Publish when you are done. The new page will appear on the screen and you'll see the title of your page in the SuperNav on the left.

Following the above instructions, the default content type Page and a default page template are selected. To learn more, see Learn about content types and Learn about page templates.
Add post to blog, news, or forum, or add an event
Adding a post to a blog, forum or news section or to a calendar is almost exactly the same as adding a basic page.
- Navigate to the page where you want to add a new post or event.
- Add a new page:
- Blog, News or Forum: Click the Add button (plus icon) to create a new post. You can set a future date to publish the post or make it "Sticky" so that it stays at the top of the Blog/News/Forum.
- Calendar: Click the Add button (plus icon) to create a new event. You can choose the event type, set the time and date(s) of the event and specify the timezone.
- Click Publish when you are done adding content and editing your post. Blog, news or forum posts will show in the list of posts. An event will show on the calendar on the date(s) you chose.
Date options when adding post or news item
When you follow the above instructions to add a post to a blog, forum or news section you will see three options that do not appear when you add other types of intranet pages.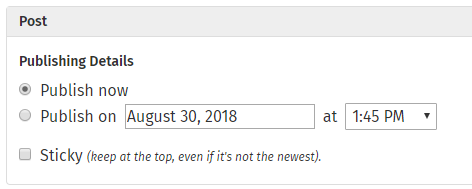
- Publish now: Click this to set the official publish time and date as the moment you click Publish on the post.
- Publish on: Use this to set a future date, time and timezone for the post to publish and show at the top of the section. Or set a past date for a retroactive post. If you set a future date for the post to publish, the post will only be visible to the page owner and administrators until the time it is set to publish, when it will become visible to everyone with View permission on the post.
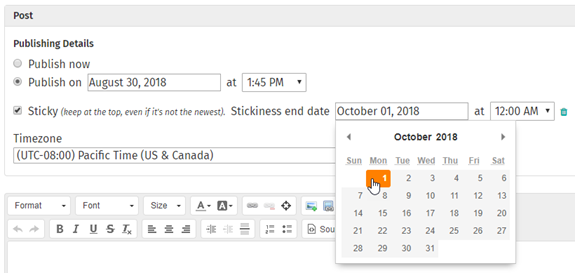
- Sticky: Check this box to keep your new post at the top of the section, even after it's not the newest post anymore. You can set a date for the post to stop being sticky, or just edit the page and uncheck the box when the post is no longer as relevant. To set a date, select the Sticky checkbox, then click on Always or the edit button that appears on the right. Click on the date and time that now show to bring up a calendar and dropdown menu for setting date, time and timezone for the post to stop being sticky.
Edits are automatically saved
You still need to click Save when you are done editing a page, but as you make changes to a page, your changes are automatically saved by the intranet. While you are editing a page, if your browser crashes due to a network or internet connection failure, the changes you have made will be saved. When you log in again and edit that page (or if you were creating a new page, add a page in the same location), your changes will be there!
Comments
0 comments
Please sign in to leave a comment.