Add page header images

Page header images add personality to the intranet

You can add visual interest and either uniqueness or continuity by adding a page header image. The page header is the area below the main navigation that contains the page title, add and edit buttons, and social and page actions. If you click the down arrow on the right of the page header, it expands to reveal more page information and controls.
A unique page header image can make a page stand out from others on the intranet. However, choosing to have the same page header throughout a section of the intranet can lend continuity to a department's pages, or to information all related to the same topic. Page header images can be used to good effect for different purposes.
If you don't want to add a specific photo or image in your page header, you can pick a gradient color to show in the page header. You can also have a narrow line of color at the top of your page header, or no color or image above your page title.
Expanded page header:
Page header image inheritance
Pages by default will have the same page header image or format that is found on their parent page. Once you change the page header image or format on a page, it is no longer affected by changes to the parent page's page header.
Page header formats
There are four formats available in the page header settings overlay in edit mode. For the image options, you can upload an image, select an image from an intranet gallery or from Unsplash, or select one of the available gradient color options.
Image with title overlay: The page header image shows at the top of the page with the page title overlaid on the image. You can specify the font color for the title to allow for good readability on the selected image.

Image with title separate: The page header image shows at the top of the page with the page title below.

Line: Choose one of several gradients or colors to have a narrow line of color at the top of the page.

None: No image or color. The page title will show at the top of the page.

Image size and file type
The recommended image size for a page header image is 1200 x 700 pixels. The page header image height is dependent upon screen width and the length of the page title. Recommended file types are GIF, JPG and PNG. For detailed information, see Page header image guidelines.
How to add a page header image to a page
- In edit mode, click on the gear icon in the top right of the page header. The Page header settings overlay opens from the right.

- Under Header format, select either the Image with title overlay or the Image with title separate option. (See Non-image page header formats heading below to learn about page header formats without large images.)
- Under Background, click Replace. The Choose Image pop-up window will appear.
- If you just want to pick a gradient color as the page header image, click on the color you want, and skip to step 8.

- If you want to add an image, do one of the following:
- Drag and drop an image onto the window.
- Click on Upload Images at the top, or click on the camera icon in the window.
- Click on the Unsplash tab (and see Insert images from Unsplash for more details).
- Click on one of the displayed galleries, and select an image from the gallery.
- If you choose the second option in step 5, browse to the image you want, click once on the photo file and then click Open in your file browsing window.
- After uploading, your image will show in the window. Make sure the image you want to use for the page header has a checkmark on it. (If not, click the image to select it.)
- Click Done in the Choose Image window.
- (Image selected only) In the Page header image pop-up window that appears, the vertical center of the image is selected as the "safe area" that will always display no matter the dimensions of the image. Click and drag the "safe area" box up or down to select the area that you want to display.
- Click Done in the Page header image pop-up window.
- (Image with title overlay format only) If you want your title font color to be a different color than the current one, select a new Title color under the selected format by entering a hex color code or clicking on the color swatch and using the color picker.
- Click Done in the Page header settings overlay.
- Continue editing or click Save. The photo will now appear in the page header at the top of your page.
If you want to use an image that has already been uploaded to the page as your page header image, select it from the Choose Image pop-up window instead of uploading a new image, and then click Done.
Non-image page header formats
If you don't want a large image at the top of your profile page, use the page header formats Line or None.
- In edit mode, click on the gear icon in the top right of the page header.
- The Page header settings overlay opens from the right.
- Under Header format, select the Line or None radio button.
- If you select the Line option, then select the radio button below for the gradient color that you want to use.
- Click Done in the Page header settings overlay.
- Continue editing or click Save at the top of the page. The selected header format will now show on the page.
If you have changed your page header and you would like to go back to having the same page header as the parent page, click Reset page header to parent page in the Page settings overlay.
Use page header image for Thumbnail
When you add a new page header image, a new option becomes available in the Thumbnail image section - to use the page header image for the Thumbnail image. If the page header image is the only image available on the page, it will automatically be selected as the thumbnail image.
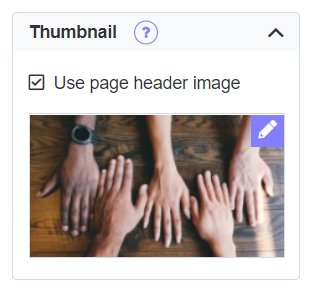
If there are multiple images available on the page, add the page header image to the page, then under the Thumbnail heading on the right, select the checkbox Use page header image. The page header image will show in the Thumbnail section, and if you change the page header image in the future, the Thumbnail image will automatically change.
Comments
0 comments
Please sign in to leave a comment.