Add a profile photo

Profile photos make the intranet more human
Use the instructions in this section to upload or replace a photo, select a great profile photo in the right file format, and avoid common profile photo mistakes. You'll be amazed at how much more alive and personal the intranet feels when comments and recent activity are accompanied by thumbnails of profile photos. A photo on your profile page makes you so much more real to colleagues who work in different offices and don't get to see you in person. It will also make it easier for visiting colleagues to recognize you.
To learn how to add a cover photo to your profile page, see How to add a profile cover photo.
Click "Edit profile" to upload or replace profile photo
Profile photos may come in all shapes and sizes, so when you add a profile photo, you can crop it to choose what shows on your profile.- Click on your name or profile photo in the top right on any page, and click Edit profile in the menu that opens.
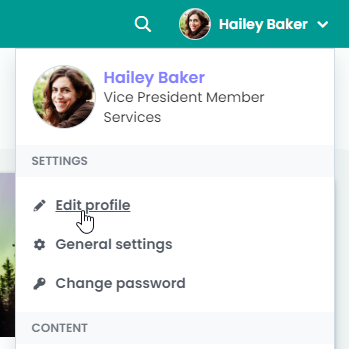
- Click Edit profile photo under the circle on the left hand side. The Choose Image pop-up window will appear.
- To add an image, do one of the following:
- Drag and drop images onto the window.
- Click on Upload Images at the top.
- Click on the camera icon in the window.
- If you did b. or c. in step 4, browse to the image you want, click once on the photo file and then click Open in your file browsing window.
- After uploading, your image will show in the window. Click Done.
- The Profile photo pop-up window will appear. In this window, use the plus and minus buttons to zoom in or out on the photo, and click and drag on the photo to choose which part to display. If the photo needs to be rotated, click Rotate left or Rotate right till you get the correct orientation. To choose a different photo, click the Replace button.
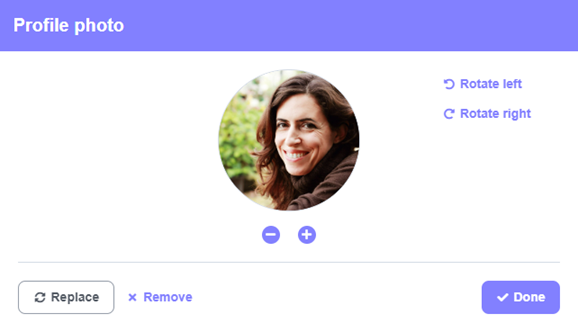
- When you are satisfied with the part of your photo that displays in the circle, click Done. Your profile photo will show in the circle to the left of your name.
- Click Save at the bottom of the page.
If you don't upload a profile photo, an image of a circle with your initials in it will show (or another generic profile photo chosen by your intranet administrator).
Photo details
- Close enough to recognize face: Use a photo that shows your face clearly. You want someone who has never met you before to see you for the first time and say "I recognize you from your profile photo!"
- Choose the photo crop: The default crop is centered in the photo vertically and horizontally, but you can zoom in to focus on your face, and click and drag to change the part of the photo that displays.
- Recommended image size for ThoughtFarmer: The recommended minimum size for profile photos on your ThoughtFarmer intranet is 300x300 pixels. This allows for some cropping and positioning while still maintaining a clear photo.
- Considerations for Active Directory: Your intranet can be set up to sync its profile photos with your organization's Active Directory (AD). If this is the case, you may want to pick a profile photo that will work with AD's photo restrictions. Photos in AD must be 96x96 pixels or smaller, and 100kb or smaller. You can upload a larger photo, but it's size will be reduced before syncing with AD, and this may affect the quality of the photo if AD uses it for other applications. Please note that the photo sync does not support animated GIFs for profile photos.
- Correct orientation: Occasionally, a photo may have data connected to it that causes it to upload in the wrong orientation. If this happens, just click the Rotate left or Rotate right options in the Profile photo pop-up window that appears after uploading your photo.
Comments
0 comments
Please sign in to leave a comment.